Parts of a Digital SLR Camera: Complete Guide
The parts of a digital SLR camera are the lens, mirror, pentaprism, viewfinder, image sensor, shutter, aperture, and control panel, all working together to capture and process images with precision.
Key Takeaways
- A digital SLR camera consists of external controls (viewfinder, mode dial, shutter button) and internal optics (mirror, pentaprism, focusing screen).
- The reflex mirror and pentaprism system provides a true optical viewfinder experience, distinguishing DSLRs from mirrorless cameras.
- Modern DSLRs incorporate advanced electronic components like CMOS sensors, image processors, and dual memory card slots for high-speed shooting.
- Understanding each part enables better maintenance, troubleshooting, and informed decisions when upgrading or repairing your camera.
- According to the Adorama Learning Center, the seven basic camera parts are lens, shutter, aperture, image sensor, viewfinder, body, and memory card slot.
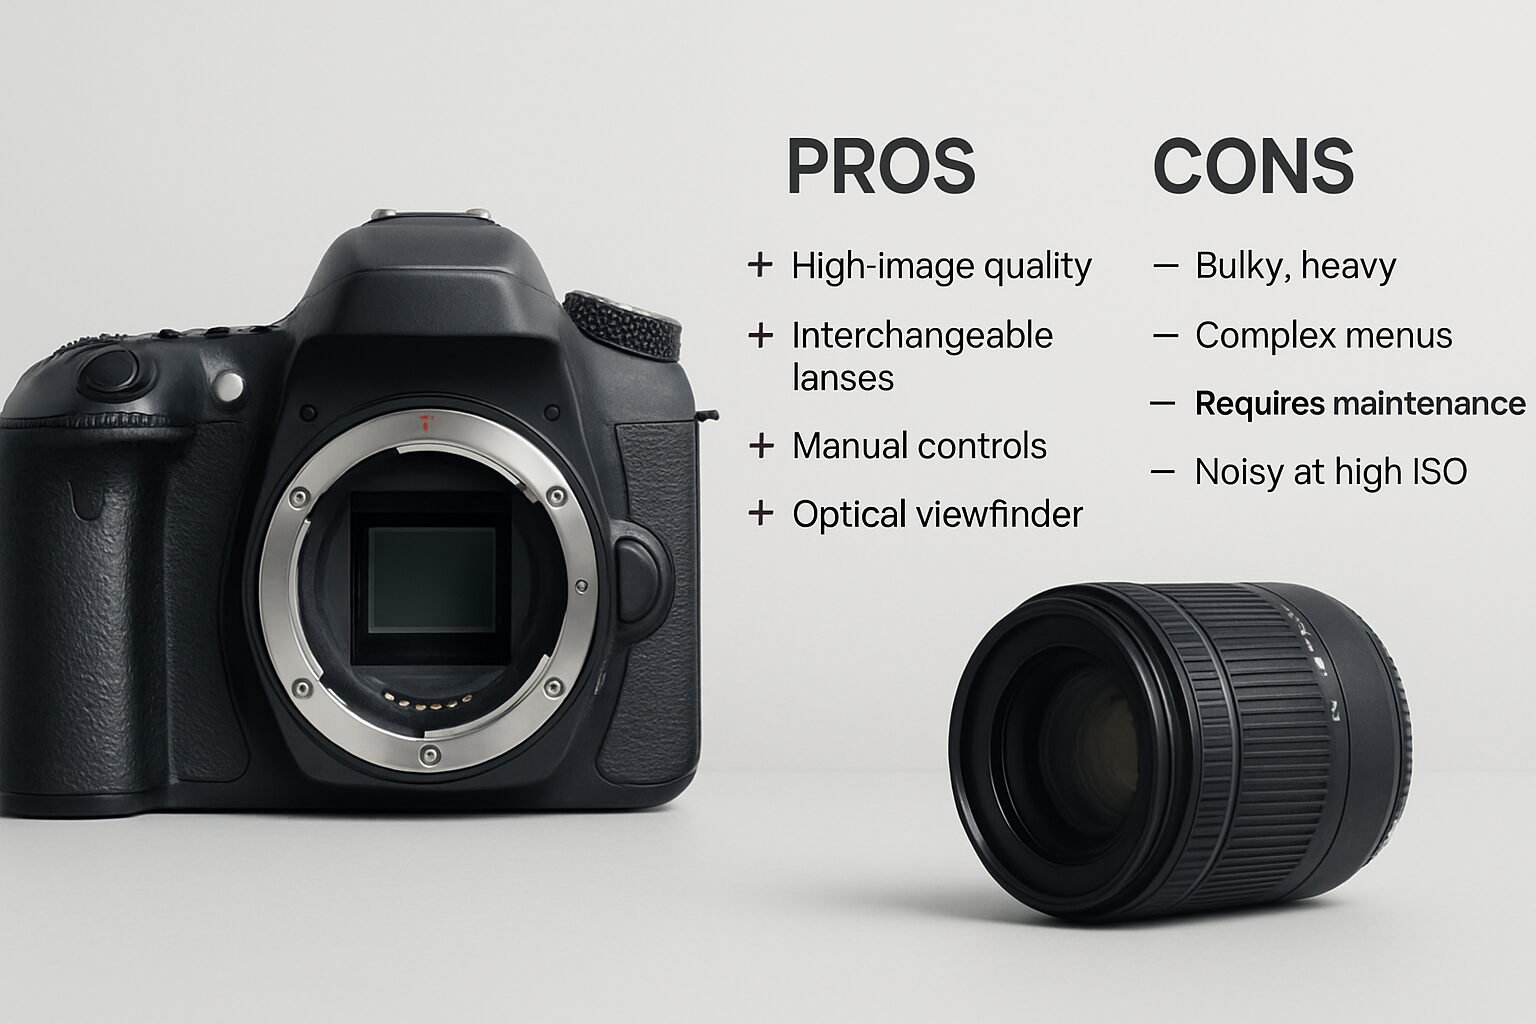
Pros and Cons
Pros
- Optical viewfinder delivers a true, lag-free, battery-efficient framing experience unavailable on mirrorless systems.
- Interchangeable lens systems (Canon EF, Nikon F) give access to decades of glass, from wide-angle to super-telephoto, often at lower cost than mirrorless equivalents.
- Robust, weather-sealed magnesium alloy bodies on professional models like the Nikon D780 handle demanding field conditions reliably.
- Extensive aftermarket support means replacement parts, battery grips, and accessories remain widely available and affordable.
- Phase-detection autofocus through the dedicated AF sensor module delivers fast, accurate subject tracking in bright conditions.
Cons
- The reflex mirror and pentaprism assembly adds size and weight compared to mirrorless designs, which can be up to 30% lighter.
- Mirror blackout during exposure interrupts the viewfinder image, which can be disorienting during fast-action shooting.
- Live view and video performance lag behind mirrorless cameras because the mirror must lift, bypassing the dedicated phase-detection AF module.
- Shutter mechanisms have finite lifespans, often rated around 150,000 actuations on prosumer models, requiring eventual replacement.
1. The Key External Parts of a Digital SLR Camera
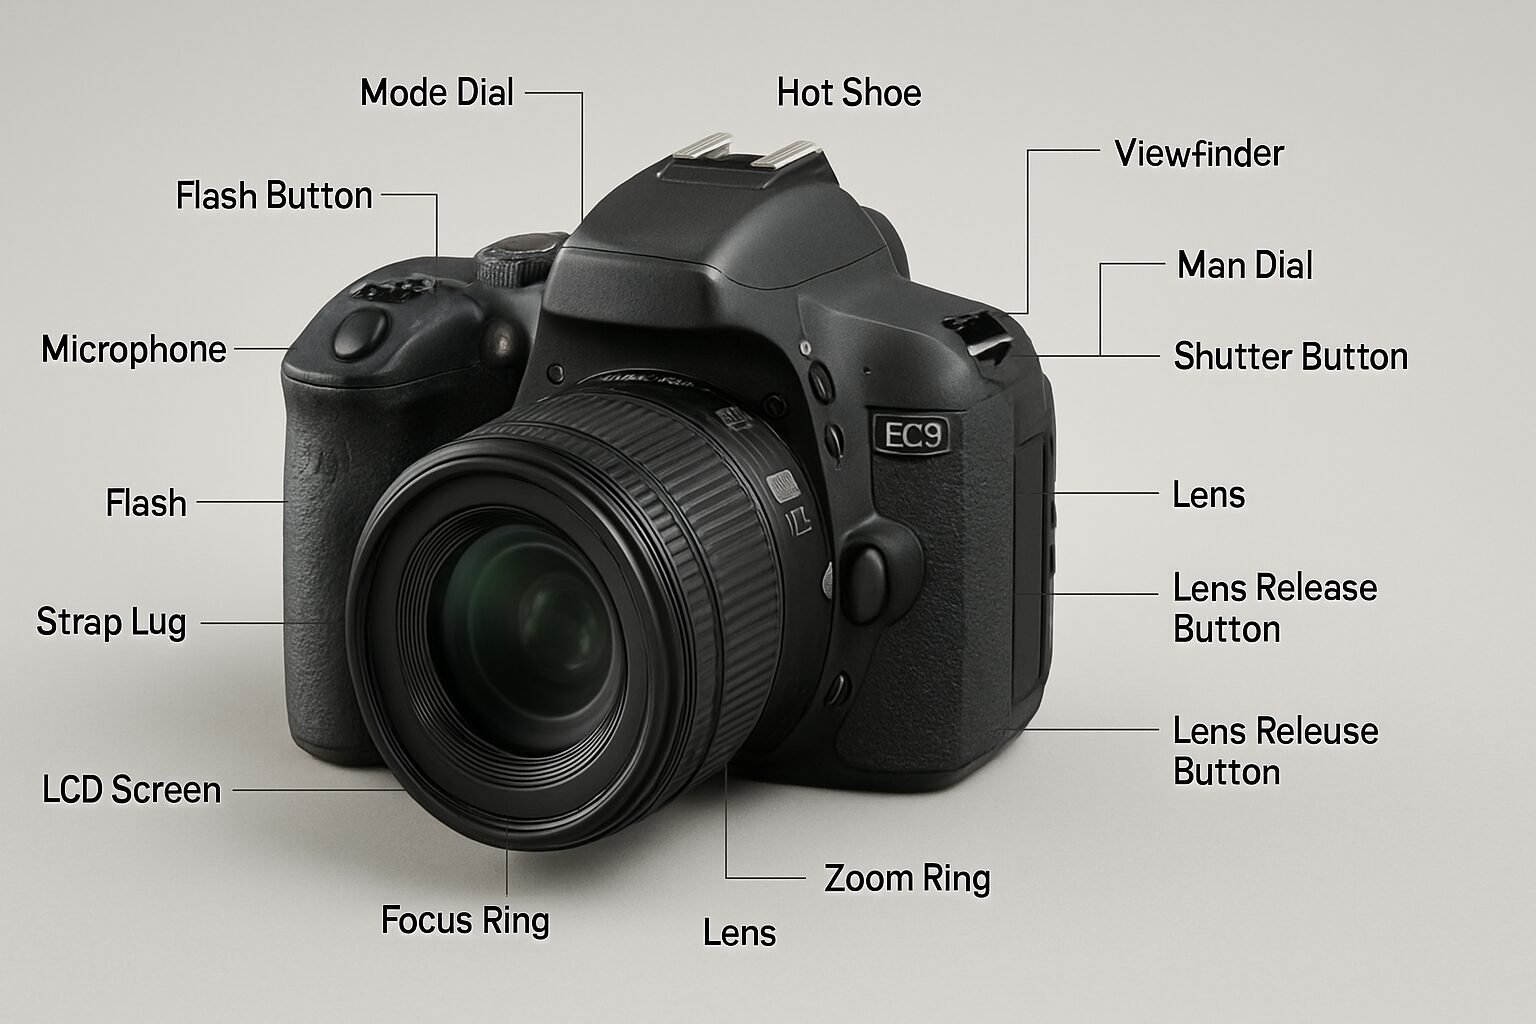
Camera Body and Control Layout
The body is the structural housing for all internal slr camera. Typically built from magnesium alloy or polycarbonate, it provides weather-sealing on professional models like the Nikon D780. On the top plate you will find the mode dial, power switch, shutter-release button, and command dials. The rear holds the LCD monitor, multi-selector, and playback controls. Battery chamber and memory card slot covers sit on the bottom or side of the body. Knowing the external layout cold is what separates photographers who react in a split second from those still hunting for the right dial.
The Viewfinder and LCD Monitor
The optical viewfinder is the defining feature of DSLR design, showing the scene directly through the lens via mirrors and prisms. Indicators for shutter speed, aperture, ISO sensitivity, and shots remaining are displayed around the viewfinder frame. The Nikon D780, for example, displays a “k” symbol when over 1,000 exposures remain on the card. Many DSLRs also feature a tilting LCD monitor with touch controls for focus point selection and image review, adding real flexibility when shooting from low angles or overhead.
Mode Dial and Shutter Button
The mode dial switches between automatic, semi-automatic, and manual exposure modes, and often includes dedicated scene modes for portraits, landscapes, and sports. The shutter button is a two-stage switch: a half-press activates autofocus and metering, while a full press releases the shutter curtains. Some DSLRs, including the Nikon D780, add a dedicated movie-record button beside the shutter for instant video capture. These this type of camera are your primary creative controls, so learning their feel without looking down is worth every minute of practice.
2. Internal Optical Parts of a Digital SLR Camera
Reflex Mirror and Focusing Screen
The reflex mirror is a hinged element that redirects light from the lens upward to the focusing screen, a matte glass surface where the image is projected for composition. When the shutter fires, the mirror swings up and light reaches the sensor. This mechanism is the defining characteristic of the entire DSLR category. According to Wikipedia, the first prototype filmless SLR was demonstrated by Sony in 1981, using a color-striped 2/3-inch CCD with 280,000 pixels.
Pentaprism and Viewfinder Optics
The pentaprism is a five-sided glass prism that corrects the left-right reversal introduced by the reflex mirror, ensuring the viewfinder image is correctly oriented. Higher-end DSLRs use a solid glass pentaprism, while entry-level models employ a pentamirror system that is lighter but noticeably dimmer. The Nikon D780 features a bright pentaprism viewfinder with approximately 100% frame coverage, eliminating compositional guesswork. A condenser lens between the focusing screen and pentaprism further corrects color fringing and improves light transmission through the optical path.
Focal-Plane Shutter and Aperture Mechanism
The shutter is a focal-plane type positioned directly in front of the image sensor, consisting of two curtains that move vertically to control exposure time. DSLR shutters are rated for durability, with prosumer models typically exceeding 150,000 actuations before service is needed. The aperture mechanism, housed within the lens itself, adjusts the opening size to regulate light and depth of field. Modern DSLRs control aperture through electronic contacts, enabling precise adjustments in 1/3-stop increments. These internal this kind of slr camera work in tandem to produce sharp, well-exposed frames every time.
3. The Lens System and Mounting Parts
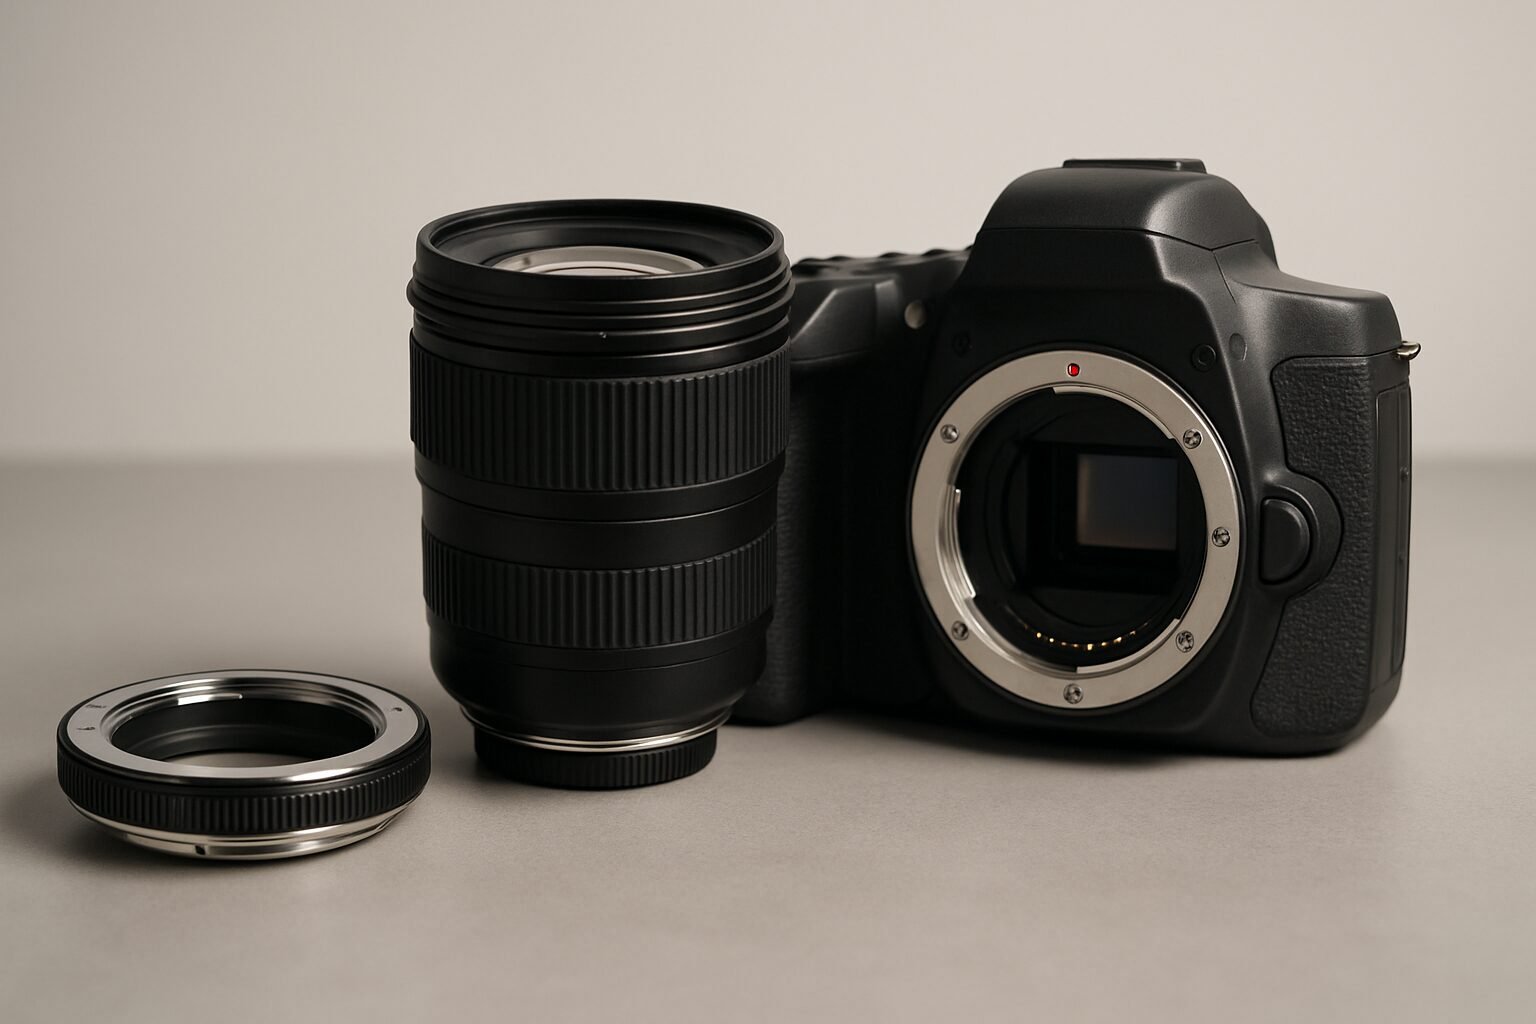
Lens Mount and Release Button
The lens mount is the mechanical interface that attaches the lens to the camera body, and each manufacturer uses a proprietary standard: Canon EF, Nikon F, Sony A-mount. Compatibility stays within each ecosystem unless adapters are used. The lens release button unlocks the mount so you can detach the lens safely without forcing it. On the Nikon D780, a lens mounting mark helps align the lens before twisting it into place. The focal plane mark on the body indicates the exact sensor plane position, which matters for precise macro photography distance calculations.
Interchangeable Lenses and Autofocus Mechanisms
DSLRs support a wide range of interchangeable lenses, from ultra-wide angles to 600mm super-telephoto primes. Each lens contains multiple glass elements, an aperture diaphragm, and often a built-in autofocus motor. The camera body communicates with the lens through CPU contacts, transferring data for autofocus, aperture control, and image stabilization commands. Many Nikon lenses feature Silent Wave Motor (SWM) technology for fast, quiet focusing that does not disturb subjects. The ability to swap glass across an entire ecosystem is one of the most compelling reasons photographers invest in a DSLR system rather than a fixed-lens camera.
Table: Quick Reference of Key Parts of a Digital SLR Camera
| Component | Location | Function |
|---|---|---|
| Lens Mount | Front of body | Secures lens and enables electronic communication |
| Reflex Mirror | Inside body behind lens | Reflects light to focusing screen for viewfinder preview |
| Pentaprism | Above mirror box | Corrects inverted image and projects it to viewfinder |
| Focusing Screen | Between mirror and prism | Ground glass where light is focused for composition |
| Shutter | In front of sensor | Controls exposure time by opening and closing curtains |
| Image Sensor | Behind shutter | Converts light into digital signals |
| Control Panel | Top of body | Displays shooting parameters at a glance |
| Memory Card Slot | Side/bottom of body | Stores captured images and videos |
| Battery Chamber | Bottom of grip | Houses rechargeable battery |
This table summarizes the most critical the of a digital slr camera, highlighting their locations and primary roles in the imaging process.
4. How the Reflex Mirror and Pentaprism Shape Your View
The Light Path Through a DSLR
Understanding the light path is the fastest way to understand why the camera are arranged the way they are. Step 1: Light enters the lens and passes through the aperture. Step 2: The light strikes the reflex mirror, which reflects it upward to the focusing screen. Step 3: The image on the focusing screen passes through a condenser lens and then the pentaprism, which flips it both vertically and horizontally. Step 4: The corrected image appears in the viewfinder eyepiece. Step 5: When the shutter fires, the mirror swings up, the shutter curtains open, and light hits the image sensor. This entire sequence happens in milliseconds, enabling real-time optical preview with zero electronic lag.
Why the Pentaprism Is Critical for Accurate Framing
The pentaprism ensures that what you see in the viewfinder matches the final composition exactly, a key advantage over rangefinder or twin-lens reflex designs. The Nikon QV-1000C, released in 1988, already used a TTL viewfinder with a pentaprism to deliver accurate framing in an early electronic still camera. Today’s DSLRs achieve nearly 100% frame coverage on professional bodies, eliminating the need to guess what gets cropped. The brightness and clarity of the prism directly shape the shooting experience, which is why professional bodies invest in high-quality solid glass pentaprisms rather than mirror assemblies.
Differences Between Pentaprism and Pentamirror Systems
Entry-level DSLRs often replace the solid glass pentaprism with a pentamirror assembly, a series of mirrors that achieve the same correction at lower cost and reduced weight. Pentamirrors are adequate for beginners, but they produce a dimmer viewfinder image and can introduce slight edge distortion at the frame boundaries. The Canon RC-701, an SVF-SLR introduced in 1986 with a 380,000-pixel sensor, featured an SLR-style viewfinder that demonstrated how optical path design was already a priority even in early digital experiments. Knowing the difference between these internal parts of helps photographers weigh price against performance when choosing a body.
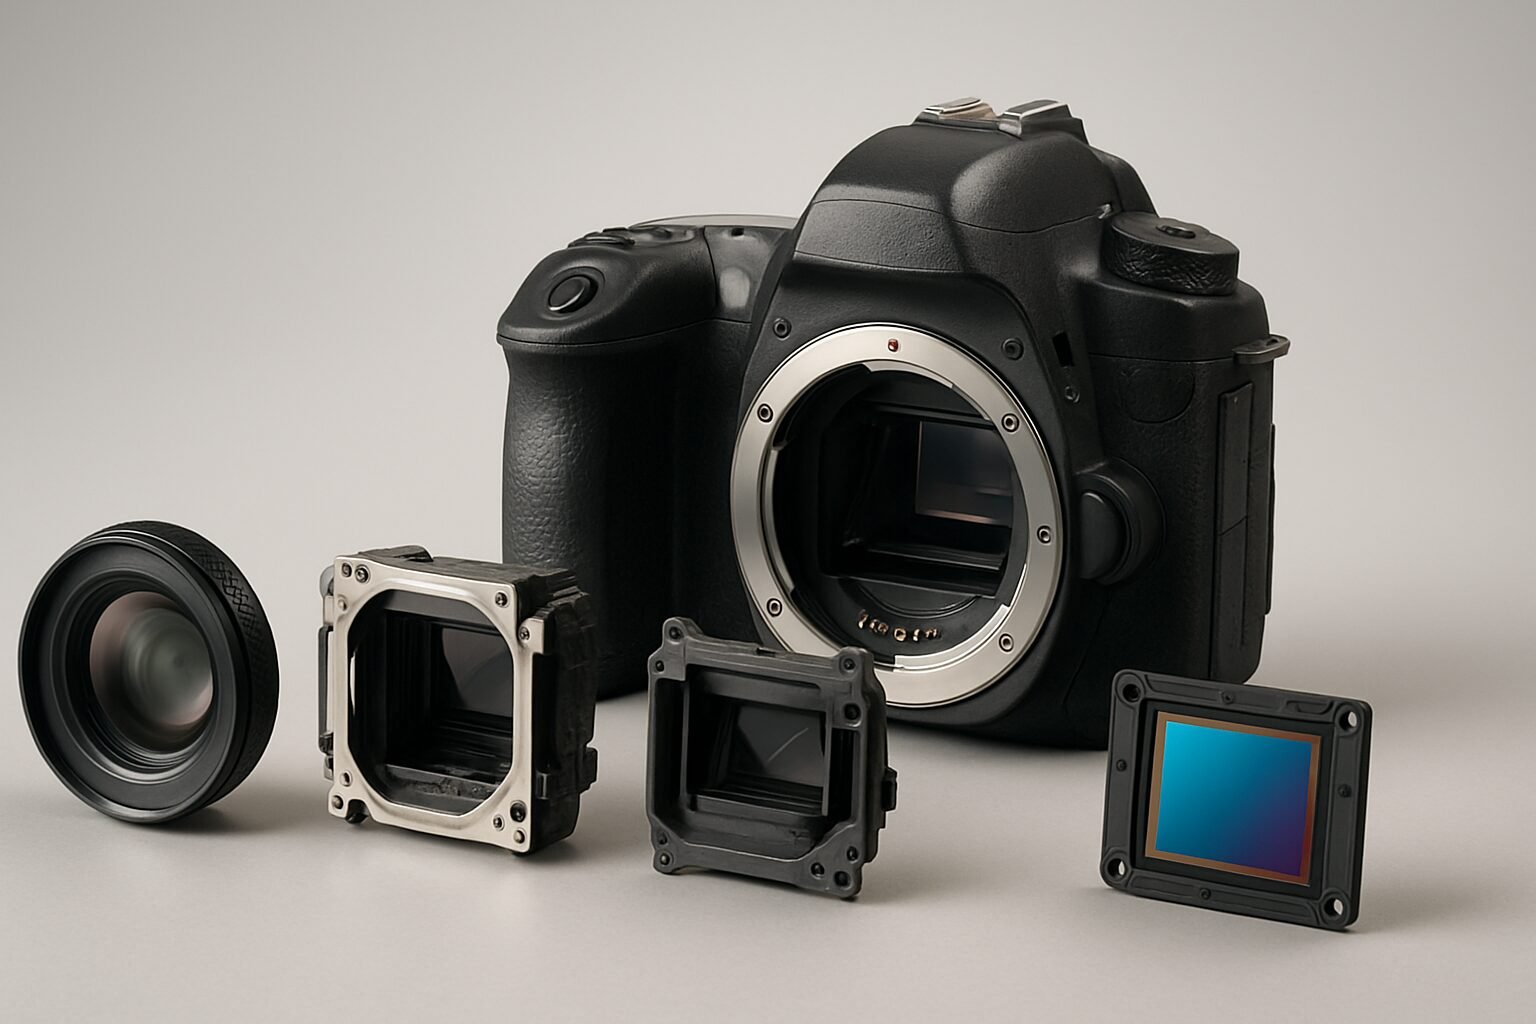
5. Electronic Components: Sensor, Processor, and Storage
The Image Sensor: CCD vs. CMOS
The image sensor is the digital equivalent of film, converting light into electrical signals that become your photograph. Early digital cameras, like the Fairchild MV-100 from 1973, used a CCD with just 100 x 100 pixels. Modern DSLRs use CMOS sensors that deliver better noise performance and lower power consumption across the full shooting range. Sensor sizes span from APS-C to full-frame, with full-frame providing superior low-light performance and dynamic range. The Nikon D780 employs a full-frame CMOS sensor capable of detailed images even at high ISO settings, making it a benchmark for the category.
Image Processor and Metering Systems
The image processor handles demosaicing, white balance, noise reduction, and JPEG compression, all in real time. Advanced metering systems, such as the 180,000-pixel RGB sensor found in many Nikon bodies, analyze the scene to determine optimal exposure before you press the shutter. These electronic slr camera operate in milliseconds, enabling subject tracking, face detection, and burst shooting at 7 frames per second or faster on mid-range bodies. The top-plate control panel displays live metering results so photographers can make quick exposure corrections without pulling the camera away from their eye.
“The image processor is the brain of the modern DSLR. Sensor resolution gets the headlines, but processing speed determines whether you actually capture the moment.” – HubSpot Marketing Blog, referencing camera technology adoption trends in content creation workflows
Memory Cards and Buffering
DSLRs store images on removable memory cards in SD, CF, or XQD formats depending on the body tier. Buffer memory temporarily holds data during continuous shooting to prevent write-speed bottlenecks from interrupting your burst. The Nikon D780 features dual SD card slots that support simultaneous backup or overflow recording, a practical safeguard for event and wedding photographers. When the buffer clears, the memory card access lamp turns off. The camera displays a “k” symbol when storage remains for over 1,000 shots, a small but genuinely useful indicator during long shoots.
6. Autofocus Sensor Technology and Phase Detection
The Dedicated AF Module
One of the most technically sophisticated this type of camera is the dedicated autofocus sensor module, positioned below the reflex mirror via a secondary mirror that reflects a portion of incoming light downward. This module uses phase-detection AF points, comparing two slightly offset versions of the same image to calculate focus distance and direction in a single step. Professional DSLRs like the Nikon D780 carry 51 AF points, including cross-type sensors at the center that work in two axes for faster lock-on. Phase detection is significantly faster than the contrast-detection method used in basic live view, which is why DSLRs still dominate in sports and wildlife photography where subjects move unpredictably.
Live View, Video, and the Mirror Lockup
Live view mode lifts the reflex mirror and reads image data directly from the CMOS sensor, bypassing the optical viewfinder entirely. This enables video recording and precise manual focus on the LCD, but it also disables the dedicated phase-detection AF module. Many DSLRs compensate with on-sensor phase detection pixels embedded in the CMOS array, as seen in the Nikon D780, which uses the same sensor-based AF system as the mirrorless Z6 II for smooth live view and video performance. Video-specific parts of a digital SLR camera include the HDMI output port for external monitors, a microphone input jack for clean audio, and headphone monitoring on higher-end bodies.
7. Flash System Parts and Dust Reduction
Pop-Up Flash and Hot Shoe
Most consumer and mid-range DSLRs include a built-in pop-up flash that provides a guide number of roughly 12 meters at ISO 100, useful for fill light in daylight or emergency illumination indoors. The hot shoe on the top plate accepts external speedlights and triggers, with TTL (through-the-lens) circuitry communicating flash power automatically based on the metering system’s reading. Professional DSLRs like the Canon 5D Mark IV omit the pop-up flash entirely, prioritizing a cleaner top-plate design and assuming users will invest in dedicated speedlights. Understanding the flash system parts of a digital SLR camera helps you plan lighting setups before you arrive on location.
Ultrasonic Dust Reduction System
Dust on the sensor appears as dark spots in images, particularly at narrow apertures like f/16 or f/22. Many DSLRs include an ultrasonic dust reduction system that vibrates the low-pass filter in front of the sensor at high frequency, shaking loose particles onto an adhesive strip below. This system activates automatically at startup and shutdown. For stubborn contamination that survives the ultrasonic shaker, a rocket blower removes loose particles without contact, while sensor cleaning swabs with appropriate solution handle smudges. The reflex mirror and focusing screen are far more delicate than the sensor filter, so avoid touching them directly under any circumstances.
8. Power Supply Options: Batteries, Grips, and Adapters
The parts of a digital SLR camera that photographers overlook most often are the power supply components, until a battery dies mid-shoot. Standard DSLRs run on proprietary lithium-ion battery packs, with entry-level bodies delivering roughly 500 shots per charge and professional bodies exceeding 1,000 shots when using the optical viewfinder. Battery grips attach to the bottom of the body, doubling capacity by housing a second battery and often adding a vertical shutter release for portrait-orientation shooting. AC adapters and DC couplers allow studio-based photographers to run the camera indefinitely from a wall outlet, eliminating battery anxiety during long tethered sessions. Third-party battery options are widely available, though genuine manufacturer batteries consistently deliver rated capacity and communicate charge levels accurately to the camera body.
9. Comparing DSLR Parts to Mirrorless Camera Designs
Removed Parts: Mirror and Prism Housing
Mirrorless cameras eliminate the reflex mirror and pentaprism, relying instead on an electronic viewfinder (EVF) that reads data directly from the sensor. This simplifies the internal mechanism and reduces weight considerably. Without a mirror box, manufacturers can shorten the flange focal distance, enabling thinner bodies and broader compatibility with adapted lenses from other systems. Optical viewfinders remain preferred by photographers who value zero-lag, battery-free composition. The removal of these key parts of a digital SLR camera fundamentally changes the shooting experience in ways that are immediately noticeable the first time you pick up each type.
Added Parts: Electronic Viewfinder and In-Body Stabilization
Mirrorless cameras introduce high-resolution EVFs that display exposure preview, histogram, and focus peaking in real time before the shutter fires. Many also incorporate in-body image stabilization (IBIS), shifting the sensor to counteract camera shake, a feature rare in DSLRs. The Canon 5D Mark IV relies on optical stabilization built into individual lenses, reflecting a different engineering philosophy that keeps the sensor fixed. These additions add complexity but enhance versatility for video and low-light work. Understanding these differences helps buyers choose between the two systems based on their actual shooting style rather than spec-sheet comparisons.
Impact on Camera Body Size and Lens Compatibility
The absence of a mirror assembly allows mirrorless cameras to be up to 30% lighter than comparable DSLRs. DSLRs, however, often deliver longer battery life because the optical viewfinder consumes almost no power. Lens mounts also evolve differently: Sony’s E-mount supports both APS-C and full-frame sensors without adapters, whereas DSLR mounts like Nikon F require careful lens selection to match sensor size. Despite the industry shift toward mirrorless, DSLRs remain popular among enthusiasts for their robust build quality, extensive lens libraries, and lower entry price points on the used market.
10. Maintaining and Replacing Digital SLR Camera Parts
Cleaning the Sensor and Mirror Chamber
Dust on the sensor shows up as dark spots, especially at narrow apertures. While many DSLRs include ultrasonic dust reduction systems, periodic manual cleaning is still necessary after heavy field use. A rocket blower removes loose particles without contact, and sensor cleaning swabs with appropriate solution handle stubborn smudges. The reflex mirror and focusing screen are extremely delicate surfaces, so avoid touching them directly. Retailers like Ace Photo stock replacement components including battery doors and eyecups for straightforward home repairs that extend camera lifespan without a service center visit.
Replacing Worn Components Like Battery Doors and Eyecups
Frequently handled components such as battery doors, hot shoe covers, and rubber eyecups wear out faster than any optical or electronic part. Replacement components are widely available from manufacturers and third-party suppliers. Battery doors for the Canon EOS 5D Mark II are available for around $34.99, while eyecups for bodies like the Nikon D7000 run approximately $13.99. These minor repairs extend a camera’s working life significantly and cost a fraction of a new body. Always check the camera manual for part numbers and confirmed compatibility before ordering.
When to Upgrade vs. Repair
If your DSLR has a malfunctioning shutter, damaged sensor, or electronic failure, weigh the repair cost against the current market value of the body. Professional camera repairs can exceed $500 for major components, which approaches the price of a newer or refurbished model. Many photographers keep older DSLRs as backup bodies or dedicated learning tools. The modular nature of the system, with interchangeable lenses, hot-shoe flashes, and remote triggers, means you can upgrade incrementally without replacing everything at once.
11. Evolution of Digital SLR Camera Parts Through History
From the First Prototypes to Modern Designs
The story of the parts of a digital SLR camera begins in 1969 with the invention of the CCD by Boyle and Smith, work that later earned them the Nobel Prize. In 1975, Kodak engineer Steven Sasson built a portable still camera using a Fairchild 100 x 100 pixel CCD. Sony publicly demonstrated the first filmless SLR, the Mavica, in 1981, using a 2/3-inch CCD with 280,000 pixels and storing images on a 2-inch magnetic floppy disk. These pioneering efforts laid the groundwork for today’s sophisticated DSLRs, which now feature sensors exceeding 45 megapixels on flagship bodies.
“From a 100-pixel Fairchild chip in 1975 to 45-megapixel full-frame sensors today, the evolution of the image sensor is arguably the most dramatic technological progression in the history of photography.” – Camera and Imaging Products Association (CIPA), industry historical overview
How Digital Sensors Replaced Film
DSLRs displaced film-based SLRs during the 2000s because of instant image review, lower per-shot cost, and easier post-processing workflows. The Canon RC-701, introduced in 1986, was the first SVF-SLR sold in the US, capturing analog video signals on floppy disks with a 380,000-pixel sensor. By the late 1990s, models like the Nikon D1 offered true digital capture at a professional level. According to creative industry data, even entry-level DSLRs today deliver image quality that surpasses 35mm film in resolution and dynamic range, making them accessible tools for millions of photographers worldwide.
Future Trends in DSLR Component Technology
While mirrorless cameras dominate new product releases, DSLR development continues in niches like sports, wildlife, and photojournalism. Advances in autofocus modules, high-speed continuous shooting, and rugged body construction keep DSLRs relevant for working professionals. As of 2026, manufacturers like Nikon and Canon still support their flagship DSLR lines, with inventories of replacement parts available through retailers like Ace Photo in Ashburn, Virginia. The enduring modularity of the system ensures that understanding the parts of a digital SLR camera remains a practical skill for years to come.
12. Mastering the Parts of a Digital SLR Camera
Understanding the parts of a digital SLR camera, from the lens mount to the image sensor, gives you the knowledge to use your equipment to its fullest potential. Whether you are composing through the pentaprism viewfinder, adjusting settings via the control panel, cleaning the sensor, or choosing between a pentaprism and pentamirror body, each component plays a specific role in the final image. The seven basic parts highlighted by the Adorama Learning Center offer a solid starting point, but the intricate interplay of mechanical and electronic systems is what defines the DSLR experience. That knowledge does not expire when a new camera model ships.
Ready to build a brand as sharp as your photography? Contact Emin Media for a free brand consultation and let’s build something bold together.
Frequently Asked Questions
What are the parts of a SLR camera?
The main parts of a digital SLR camera include the lens, reflex mirror, pentaprism, focusing screen, focal-plane shutter, image sensor, image processor, and control panel. External components include the mode dial, shutter button, LCD monitor, hot shoe, and memory card slot. Each part plays a specific role in capturing and processing the final image.
What are the 5 parts of a digital camera?
The five core parts of a digital camera are the lens, image sensor, shutter, image processor, and memory card slot. These five elements handle light capture, conversion, timing, processing, and storage respectively. All other components support or enhance these five fundamental functions.
What are the seven basic parts of a camera?
According to the Adorama Learning Center, the seven basic parts are the lens, shutter, aperture, image sensor, viewfinder, body, and memory card slot. These parts form the complete core of any DSLR system. Understanding each one gives you a functional map of how a camera turns light into a photograph.
How does the reflex mirror affect DSLR operation?
The reflex mirror redirects light from the lens up to the optical viewfinder for composition and framing. When the shutter fires, it flips up to allow light to strike the image sensor, causing a brief viewfinder blackout during the exposure. This mechanism is the defining characteristic that separates DSLRs from mirrorless cameras.
What is the difference between a pentaprism and a pentamirror?
A pentaprism is a solid glass prism that delivers a brighter, clearer viewfinder image with accurate color rendition. A pentamirror uses a series of mirrors to achieve the same optical correction at lower cost and weight, but produces a noticeably dimmer view. Professional and enthusiast DSLRs use pentaprisms, while entry-level bodies typically use pentamirror assemblies to keep prices accessible.
Can I replace the focusing screen on my DSLR?
Yes, many DSLRs allow focusing screen replacement with options for grid patterns, split-prism aids, or plain matte screens. The swap requires careful handling in a clean, dust-free environment and may affect metering accuracy on some bodies. Check your camera manual for compatible screen types before purchasing a replacement.
Are DSLR parts compatible across different brands?
No, lens mounts and most accessories are brand-specific. Canon EF lenses do not mount on Nikon F bodies without a third-party adapter, and electronic communication for autofocus and aperture control may be limited even with adapters. Always verify compatibility with your specific camera body before purchasing lenses or accessories.
Enjoyed this article?
Contact Emin Media for a free brand consultation and let's create something amazing together.
Get in Touch